Saturday 31 December 2016

Google AdSense Approval


↓ Google AdSense Approval ↓


Today in this article, in the blog we will show you how to get Google AdSense Approved in 2017 with simple steps.

The policy changes for getting approved AdSense account in 2017 now includes the following steps;


Changes in Google AdSense policies in 2017
  1. Getting a website compatible with AdSense. (AdSense on its website has a list of compatible websites).
  2. Filling the signup form for Google AdSense.
  3. Filling out the application and sending it for review
  4. Getting the AdSense code and adding it to the blog.
  5. After adding the code, blank ads will start popping up on your blog.
Speaking out of experience, an average application on Google AdSense at least takes 48 hours to get processed. Blogging gurus calls it the most crucial step in your ultimate aim of making money online; however, once it is approved your blog is ready to be on the list of money making machine, in simple words your online blogging ATM has now become functional. Now, the more meaty content as per Google SEO policies you insert, the more money it will ejaculate.

The complete process of profile completion till Google AdSense approval is as follows;
The complete Work Process


Google AdSense Account Approval Process 2017
·         Go to the AdSense website (AdSense.com). Mention all basic information like Name, blog URL, address, bank account details and passwords. It’s safer to provide your present Address with updated area code as the Google payments sometimes are delivered through cheques too.

·       Once your profile is completely updated, login to the Google AdSense account, create your AdSense code and place those AdSense code to your sidebars. Remember, Google AdSense will be placing ads on your blog once you update the sidebars with those codes.

        Google has a policy to place relevant ads as per Blog category. Therefore, the appearing ads will be similar to that of your content ben place din the blog. For example, if you have a food blog, the most relevant ads that will be appearing will be of restaurants, spices and any packaged food products.

·       Blank ads will be shown for 48 hours to a week to get approval.  Meanwhile google AdSense administration will be monitoring your blog and reviewing your application. Once you get an approval on your email, proper ads will be start popping up.

·      Once your account has been approved, a final confirmation email will be sent by Google AdSense on your email address.

·        Once your AdSense earning reaches $10, AdSense will mail you a PIN to your address.

·       Now all the hectic work is over; it’s time to roll your sleeves; Login to your AdSense account and enter your pin that you have received in your email.

·        Congratulations! So the wait is finally over; now is the time to pen down your thoughts and start adding meat to your ATM. Once your account reaches $100, you can get your payments withdrawn trough wire or direct bank transfer.

      ☝Tip
      Getting Google AdSense is not as difficult as it sounds. All you need is a bit hard work, passion and zeal of not giving up. Following AdSense policies are a must here to get approval and being smarter (updating full information) will always facilitate you! On an ending note, We wish you a great 2017 and a wealthy AdSense account. Happy Blogging!

Remove Menu Bar From Templates


How to remove the navigation menu bar from some blogger templates 

See the picture below of an expample blogger template that has the menu bar that we want to remove which is highlighted in red.


 Have you ever managed to find a blogger template that you really like only to end up not using it because it’s too much work to sort out. A lot of the new fancy blogger templates have many different menus, picture slideshows and different colour themes that are hard to match ads to. You name it, there’s a lot to sort out when you install a new blogger theme with all these different options. If you don’t know how to edit or remove what you don’t want it can be annoying to say the least. Some people, like myself, appreciate these templates looks very good but prefer a more simpler layout to work with that has side navigation and easier colours to match pictures an advertisements to.

To remove the top menu bar just follow the instructions below.

Lets say you have already installed your blogger template. If not click the Design tab > Edit HTML > Press Browse to search for your blogger template location where you downloaded it to your computer. Located the template – press Open. Now press Upload on the edit Template HTML page and your template will be uploaded. At this stage do not press the save button to make the template live. Instead, while on the Edit HTML Template page use your browsers “Find” facility. I’m using FireFox, so all you would press is the “Edit” tab, then “Find”.

Now all you need to do is search on the Edit Template HTML page for a word which is written in the menu bar. Going on the example template above I will search for the word “Business” on the Edit Template HTML page in order to locate the stack of code that we want to remove. Once you find this code you need to remove the whole block as shown below:

<div class=’span-24′ style=’height:44px;’>
<div class=’menu-secondary-container’>

<ul class=’menus menu-secondary’>

<li><a expr:href=’data:blog.homepageUrl’>Home</a></li>

<li><a href=’#'>Business</a>
<ul class=’children’>
<li><a href=’#'>Internet</a></li>
<li><a href=’#'>Market</a></li>
<li><a href=’#'>Stock</a></li>
</ul>
</li>

<li><a href=’#'>Downloads</a>
<ul class=’children’>
<li><a href=’#'>Dvd</a></li>
<li><a href=’#'>Games</a></li>
<li><a href=’#'>Software</a>
<ul class=’children’>
<li><a href=’#'>Office</a>
</li>
</ul>
</li>
</ul>
</li>

<li><a href=’#'>Parent Category</a>
<ul class=’children’>
<li><a href=’#'>Child Category 1</a>
<ul class=’children’>
<li><a href=’#'>Sub Child Category 1</a></li>
<li><a href=’#'>Sub Child Category 2</a></li>
<li><a href=’#'>Sub Child Category 3</a></li>
</ul>
</li>
<li><a href=’#'>Child Category 2</a></li>
<li><a href=’#'>Child Category 3</a></li>
<li><a href=’#'>Child Category 4</a></li>
</ul>
</li>

<li><a href=’#'>Featured</a></li>

<li><a href=’#'>Health</a>
<ul class=’children’>
<li><a href=’#'>Childcare</a></li>
<li><a href=’#'>Doctors</a></li>
</ul>
</li>

<li><a href=’#'>Uncategorized</a></li>

</ul>
</div>
</div>

Depending on what template you are using the code or menu tab names might be slighty different. But as long as you delete the block of HTML the same as the example above that should be fine.

Once you have removed this code press the “Preview” tab located at the bottom of the HTML code on the Edit Template HTML page. Have a look to see if the menu bar has disappeared. If the menu bar is now gone and everything looks fine within the template then press the “Save Template” button. That should be it.

If you pressed Preview and got an error message back like:

    “Your template could not be parsed as it is not well-formed. Please make sure that all XML elements are closed properly. <br/> XML error message: The element type “div” must be terminated by the matching end-tag “</div>”.


Don’t panic! Just go back to the Edit HTML page and press the “Clear Edits” tab. It will ask you if you want to Discard all changes – Press OK. This will then revert the template back to it’s original state. If you got the error message you must not have taken all of the code out properly. All you need to do is follow the instructions again above. Find the code again by using the “Find” or “Search” option on your browser. Search the Code for a word which is written on the menu that you want to remove, I used the word “Business”. Then delete the block of HTML code exactly as shown above and then press preview to see if it has worked. If all is good then press Save Template and that’s it.

Sunday 25 December 2016

HOW TO VERIFY MY FACEBOOK PAGE ✔


HOW TO VERIFY MY FACEBOOK PAGE 


Blue Tick Mark on Facebook ID 2016 Trick


Step by Step :


1Login to your original F.B account to get an Facebook Approved profile with blue tick.

2. Go to the following link by click here

After opening the required link you can see the following options:
i.    New first name
ii.   New first name
iii.  Choose One
iv.   Upload File.


3. Enter you First name and in Last name box you have to enter your Last Name with this symbol (✅).The symbol is in brackets, don't put the brackets in Last name just enter the symbol after the last name.


4. After that you can see an option "Pick One." Here you have yo give the reason why you are sending name change request.So, just click on pick one and select "Others."

5. Now upload an Image of you proof (CNIC,Passport,Driving licence or any other Government issued document) for Facebook.And then click on Send button.


You have successfully send the request for name change with blue tick.After 24 hours you can see your Facebook Profile name will be marked with blue tick.

Note: If you don't see any changes with your name, then try again with same process.Sometimes you requests don't reach to the Facebook team.So, don't hesitate to send again.Share if you like this article.  

Wednesday 21 December 2016

Telenor Free internet For 3 Month (20-December-2016)

Telenor is one of best Network in Pakistan because of wide network range and good internet speed, also they are providing different great internet packages.


NOW TELENOR GIVE FREE 1500MB INTERNET FOR 3 MONTH .AND  ALSO GIVE YOU EVERY MONTH 500MB...


you can see this i have also recive Free Telenor internet. so guys, Dial *345*747# and ENjoy Telenor fantastic and free Internet for 3 Month. Hurry up ! And don't forgot to SUBSCRIBE my site and youtube channel.

Ye offer mehdod modadt ke liye hy... 


Telenor free 3G 2016 Free Code For Prepaid Postpaid Djuice, Talkshawk: Telenor 3G internet packages 2016. Telenor 3G Internet packages 2016 activation and deactivation methods are also very simple. Pakistan telecom users will purchase telenor sim for best calling, internet and sms services. Telenor internet packages speed is 3G technology. Trough 3G internet package 2016 Telenor users will enjoy Telenor daily, Weekly, Monthly internet package 2016. Here 3G Daily Unlimited Bundle, Talkshawk 2G Daily Bunlde, Talkshawk 2G Daily time offer.

Monday 5 December 2016

ZXW Dongle Free 2018 .pbc Iphone/Samsung + Schematics


ZXW Tools Dongle is hands down the best software for iphone/ipad/samsung logic board repair. It’s essential if you microsoldeTool  

This ZXW Dongle setup is free in English language you can find easly fault from any iphone,samsung and other pcb i can give u iphone pcb iphone 4,4s,5,5s,5c,6,6s,6sslove 100% working 


zxw-tools-dongle

ZXW Dongle Tools latest version of software is released its officials. Here on this page you will find direct link .This is the full crack setup of ZXW Dongle Tool latest software. To start 

downloading ZXW Dongle Tools with crack

Sunday 4 December 2016

How to Download Apps Without Apple ID & Password?


step by step:

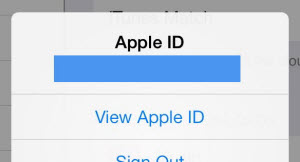
Method A: Firstly, you can sign out Apple ID. Launch App Store on your iPhone→pull down this page→find and click Apple ID→click Sign Out.

How to Download Apps Without Apple ID & Password?

Method B: Launch Settings app on your iPhone→click iTunes & App Store→click Apple ID→click Sign Out.

How to Download Apps Without Apple ID & Password?

Method C: Download apps using 3uTools.

a. Download and install the latest 3uTools on your PC, connect your iPhone to PC using the USB cable.

b.Click Apps, 3uTools will show you different kinds of applications for you to download. You just need to click Install to download and install your wanted apps. By the way, you can manage iPhone’s apps using 3uTools.

How to Download Apps Without Apple ID & Password?

It is easy to handle using 3uTools,isn’t it?

Saturday 3 December 2016

How to Unlock Apple iPhone iCloud ID through Hardware Unlock Method?


What should I do if I suddenly forget my iCloud ID’s passcode? How can I remove my iPhone’s lost mode when my iCloud ID and passcode are stolen and changed by someone else? Where is the solution if i have lost my original purchase certificate and packaging box? Is it possible to unlock my iPhone through a software unlock method?  

 How to Unlock Apple iPhone iCloud ID through Hardware Unlock Method?


 How to Unlock Apple iPhone iCloud ID through Hardware Unlock Method?

On the above photo, there are respectively 16GB hard disk/flash storage(serial number is stored here), baseband and chip from left to right. Baseband and chip are a whole set, and baseband must work with the IMEI which is stored in chip.

In general, what we need to replace are those three components, hard disk(flash memory), baseband and chip. However, some masters have cracked the data read/write of iPhone 5S’s chip; now we only need to replace baseband and hard disk, then use the particular IMEI box to write the IMEI into the chip.

Let’s see the locations of those three components.
 How to Unlock Apple iPhone iCloud ID through Hardware Unlock Method?

 1Use hot wind to disassemble the hard disk.

 How to Unlock Apple iPhone iCloud ID through Hardware Unlock Method?

2. Deal with the ponding pad of hard disk.

 How to Unlock Apple iPhone iCloud ID through Hardware Unlock Method?

3. Continue to dissemble the baseband.

 How to Unlock Apple iPhone iCloud ID through Hardware Unlock Method?

4. Deal with the ponding pad of baseband.


 How to Unlock Apple iPhone iCloud ID through Hardware Unlock Method?

5. Import the data of new chip into the original ID panel.


 How to Unlock Apple iPhone iCloud ID through Hardware Unlock Method?

6. Assemble the new hard disk and baseband, then use 3uTools or iTunes to flash this iPhone 5S.

 How to Unlock Apple iPhone iCloud ID through Hardware Unlock Method?

7. Now you can boot and activate it, and use it normally.
 How to Unlock Apple iPhone iCloud ID through Hardware Unlock Method?

How to Unlock Apple iPhone iCloud ID through Hardware Unlock Method?
Now the whole process of unlocking Apple iPhone 5S’s iCloud ID is complete. Currently 3uTools is an iOS jailbreak and flash tool, and the next big update will add many more features. To view 3uTools video tutorials, you may search 3uTools on Youtube.
If you have any questions about iOS and 3uTools, please post them on 3uTools Facebook group "3uTools for iOS Users".


another ways of icloud unclock click here